Update time on Windows with IIT Bombay NTP server
The following blog post discusses two solutions to updating time through an external/local NTP server on a Windows machine.
Problem
Windows would not update time using the standard NTP servers since they are blocked on the network.
The system time often gets messed up when switching between different operating systems on a multi-boot machine (solution to this specific problem in appendix). This problem arises when you are on a network (like the IIT Bombay network) that blocks outside NTP servers. IIT Bombay has its own NTP server- ntp.iitb.ac.in. All other standard NTP servers (like time.windows.com, time.nist.gov, pool.ntp.org) are blocked.
This problem can be easily solved on linux machines by simply adding the NTP server to /etc/ntp.conf. However, in Windows, the control panel settings would not allow you to add an external NTP server (in our case ntp.iitb.ac.in).
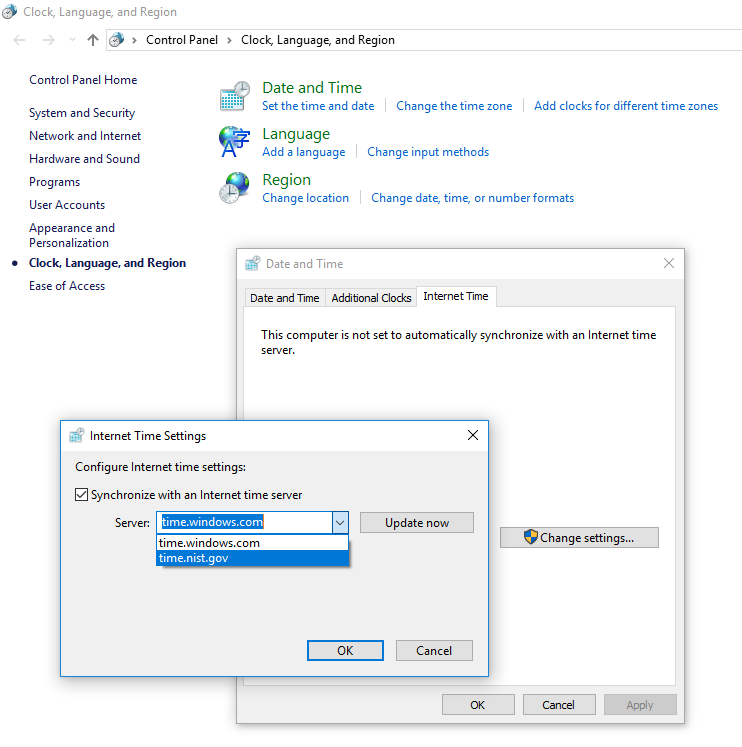
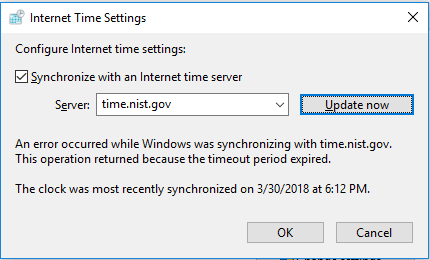
Trying to force an update through a pre-defined NTP server (like time.nist.gov) results in a time out, as shown-
Checking if an NTP server is accessible-
On windows you can check if an NTP server is accessible by running the following command in command prompt-
w32tm /stripchart /computer:ntp.iitb.ac.in /dataonly /samples:3
(Replace ntp.iitb.ac.in with your NTP server address)
This command is analogous to running ntpdate -q ntp.iitb.ac.in on a linux machine.
Testing the above command on IIT-B network, reveals this-
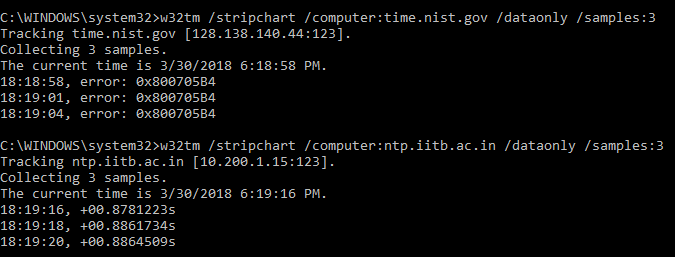
time.nist.gov is inaccessible while ntp.iitb.ac.in is accessible.
Solution 1: Python Script with Windows Task Scheduler
Description:
Make a list of NTP servers, and send a request to each until a response is received. Use socket to send a request to the NTP server on port 123. (Reference: Simon Foster’s recipe). Use win32api to update system time.
Step 1: Install Dependencies
All dependencies are standard libraries apart from win32api (a.k.a. pywin32).
Install pywin32 from here or simply do a pip install pywin32.
To install pip for Windows, refer this.
Step 2: Download the script
The script can be found in this gist.
Find Raw file here.
This script is tested with Python 2 and 3.
import socket
import struct
import sys
import time
import datetime
import win32api

# List of servers in order of attempt of fetching
server_list = ['ntp.iitb.ac.in', 'time.nist.gov', 'time.windows.com', 'pool.ntp.org']

'''
Returns the epoch time fetched from the NTP server passed as argument.
Returns none if the request is timed out (5 seconds).
'''
def gettime_ntp(addr='time.nist.gov'):
    # http://code.activestate.com/recipes/117211-simple-very-sntp-client/
    TIME1970 = 2208988800      # Thanks to F.Lundh
    client = socket.socket( socket.AF_INET, socket.SOCK_DGRAM )
    data = '\x1b' + 47 * '\0'
    try:
        # Timing out the connection after 5 seconds, if no response received
        client.settimeout(5.0)
        client.sendto( data, (addr, 123))
        data, address = client.recvfrom( 1024 )
        if data:
            epoch_time = struct.unpack( '!12I', data )[10]
            epoch_time -= TIME1970
            return epoch_time
    except socket.timeout:
        return None

if __name__ == "__main__":
    # Iterates over every server in the list until it finds time from any one.
    for server in server_list:
        epoch_time = gettime_ntp(server)
        if epoch_time is not None:
            # SetSystemTime takes time as argument in UTC time. UTC time is obtained using utcfromtimestamp()
            utcTime = datetime.datetime.utcfromtimestamp(epoch_time)
            win32api.SetSystemTime(utcTime.year, utcTime.month, utcTime.weekday(), utcTime.day, utcTime.hour, utcTime.minute, utcTime.second, 0)
            # Local time is obtained using fromtimestamp()
            localTime = datetime.datetime.fromtimestamp(epoch_time)
            print("Time updated to: " + localTime.strftime("%Y-%m-%d %H:%M") + " from " + server)
            break
        else:
            print("Could not find time from " + server)
Download the file and save it at a location you’ll remember.
For the purpose of this demonstration, I’ll be saving it inside- C:\Python27\ntp_update_time.py with my Python installation directory as C:\Python27.
Step 3: Test the script
Open Command Prompt with admin privileges- Hit key combo Windows + X, and click on Command Prompt (Admin).
Type:
cd C:\Python27
python ntp_update_time.py
If you were on IIT-B network and everything worked well, it should say- Time updated to: 2018-03-30 19:04 from ntp.iitb.ac.in
Step 4: Schedule a Task
Similar to a cronjob in Unix, you can create a task to run periodically using Windows Task Scheduler.
-
Search for “Task Scheduler” from the start menu and open it.
-
Create a basic task from the Actions menu at the right
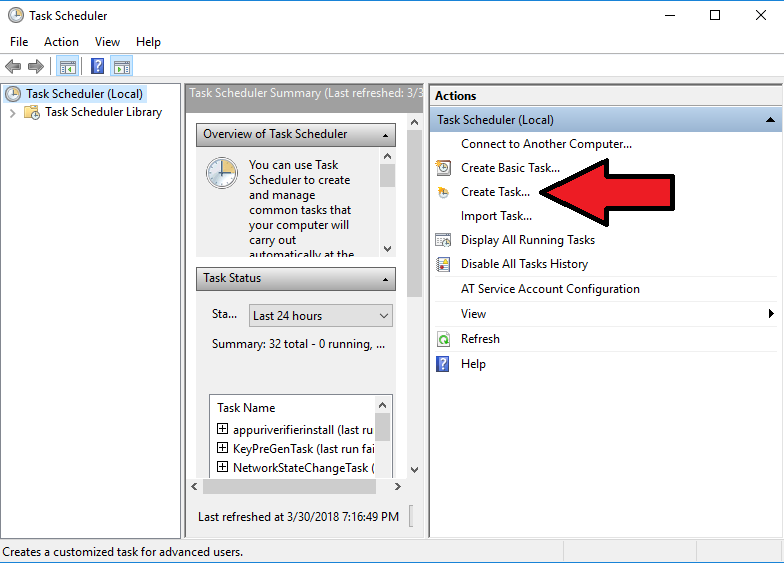
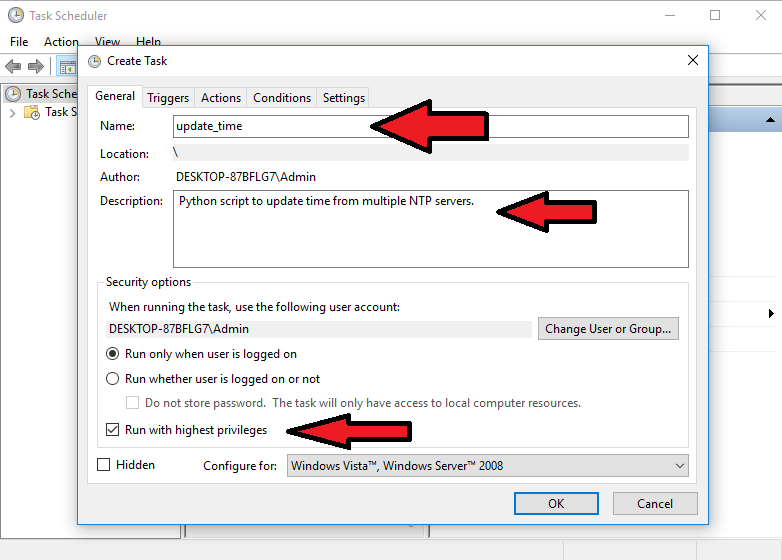
- Under the General tab, give a name and description to the task. Check the “Run with highest privileges” checkbox.
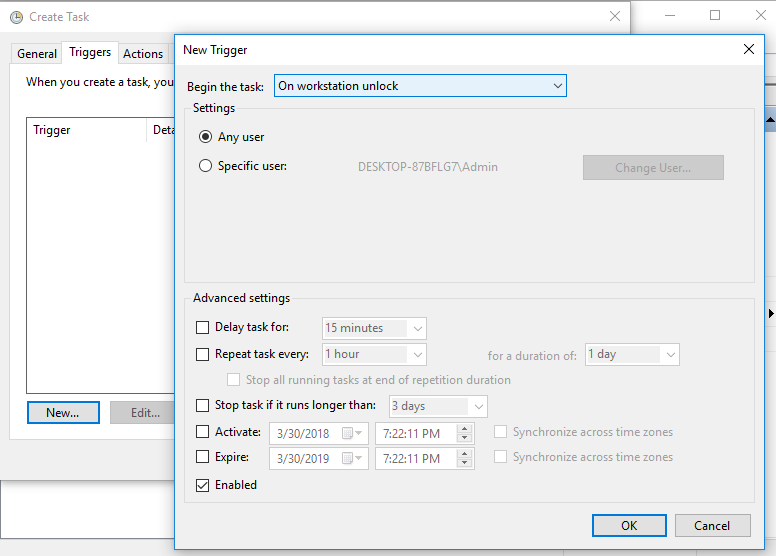
- Under the Triggers tab, click on New, and set “Begin the task:” to “On workstation unlock”. Leave everything as is, and hit Ok.
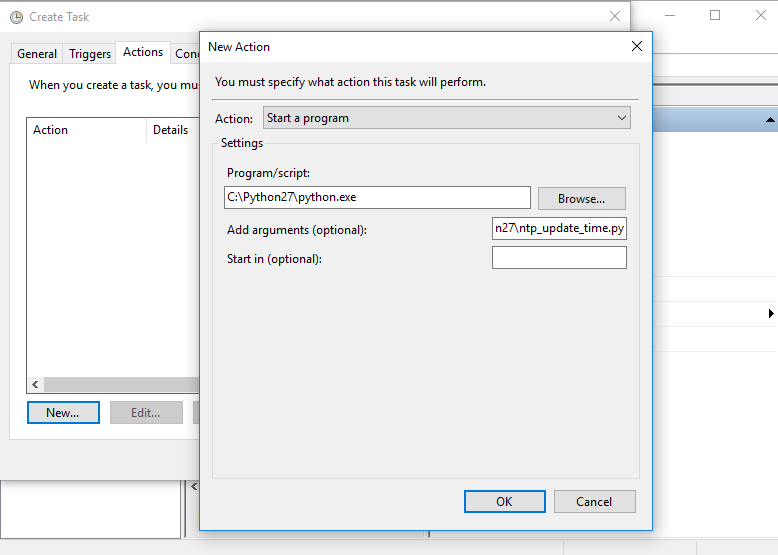
- Under the Actions tab, set Program/Script to your python path (
C:\Python27\python.exe) and set “Add arguments (optional)” to the script path (C:\Python27\ntp_update_time.py).
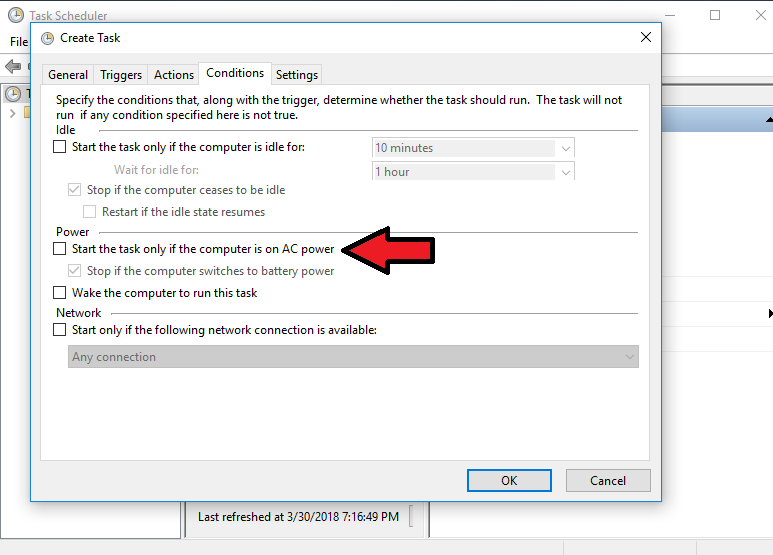
- Under the Conditions tab, uncheck the checkbox under Power which says “Start the task only if the computer is on AC power”.
- Hit Ok and save the Task. Return to the Task Scheduler window, double click on “Task Scheduler Library” on the left navigation drawer. Select the task you made from the list and click on it. Hit “Run” from the right hand actions menu. (Make sure to screw up your system time before running. If it gets fixed after you run the task, everything is set up to work.)
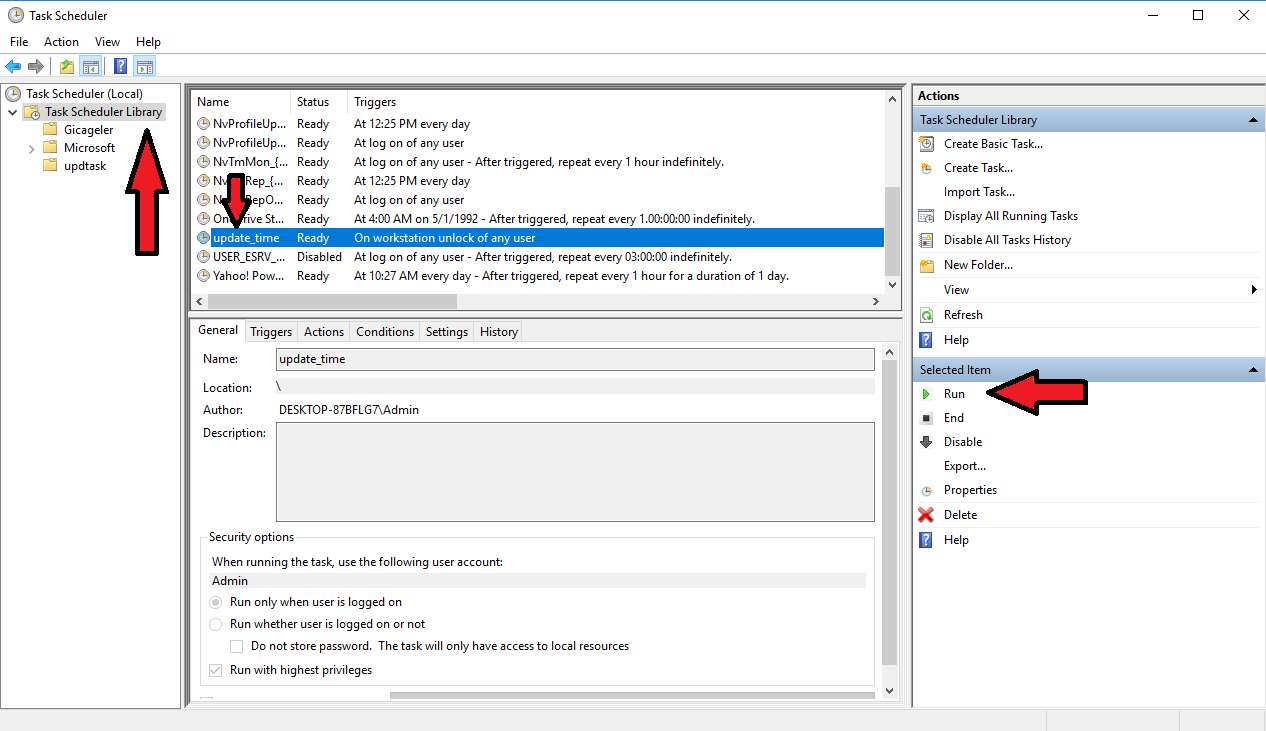
The task would be scheduled to run every time you unlock your machine. This makes sense since mostly the time gets messed up when switching between two different Operating Systems on a multi-boot machine.
Solution 2: Use Windows Time Service tools to query local NTP server
This solution uses the Windows Time Service tool to add an external/local NTP server.
- Open Command Prompt with admin privileges- Hit key combo
Windows+X, and click onCommand Prompt (Admin). - Stop the time service-
net stop w32time - Type in
w32tm /config /syncfromflags:manual /manualpeerlist:"ntp.iitb.ac.in,pool.ntp.org"to manually set the list of external/local NTP servers. - Force set the connection as reliable-
w32tm /config /reliable:yes - Start the time service-
net start w32time - Check if the configuration has been written successfully-
w32tm /query /configurationandw32tm /query /status. You should see “NtpServer: ntp.iitb.ac.in,pool.ntp.org (Local)”. - Do a
w32tm /resyncto force an update. (Make sure your system time is messed up to see if it gets corrected).
Solution 3: No NTP server reachable, update using HTTPS
In case you are unable to reach any NTP server, you can use the following script to update the time by scraping duration since epoch time from www.unixtimestamp.com.
The script can be found in this gist.
Find Raw file here.
import requests
import datetime
import win32api

page = requests.get('https://www.unixtimestamp.com/', headers={'Cache-Control': 'no-cache'})
text = page.text


for line in text.split("\n"):
	match_text = "<h3 class=\"text-danger\">"
	suffix = " <small>seconds since Jan 01 1970. (UTC)</small></h3>"
	if match_text in line:
		line = line.replace('<',' ').replace('>',' ')
		epoch_time = [int(s) for s in line.split() if s.isdigit()][0]
		break

utcTime = datetime.datetime.utcfromtimestamp(epoch_time)

try:
	# SetSystemTime takes time as argument in UTC time
	win32api.SetSystemTime(utcTime.year, utcTime.month, utcTime.weekday(), utcTime.day, utcTime.hour, utcTime.minute, utcTime.second, 0)
	localTime = datetime.datetime.fromtimestamp(epoch_time)
	print("Time updated to: " + localTime.strftime("%Y-%m-%d %H:%M"))
except:
print("Could not update time")- Install requests-
pip install requests. To install pip for Windows, refer this. - Follow Step 3 and Step 4 from Solution 1, using the script above.
Appendix
Specifically pertaining to the problem of the system time going haywire when dual booting across Windows and Linux, the Official Ubuntu documentation explains what causes this.
In essence, Linux/Unix systems store UTC as the time on the hardware clock and with good reason, since this saves unnecessary changes to the hardware clock when moving between timezones. On the other hand, Windows stores the local time as the time on the hardware clock. This ends up messing with the system time since both OS deal with the hardware clock differently.
The Official Ubuntu Docs list down a step by step solution to avoid this from happening.
That should save you from manually setting time again.
Till next ‘time’..
Cheers!